Search This Blog

Friday, October 26, 2012

Roasted and Candied Pumpkin Seeds

One of the advantages of carving a pumpkin is having the seeds as a treat too! Pumpkin pie pumpkins have sweeter seeds, but you can do this with any seeds.
 
Ingredients:
seeds from a pumpkin
1 Tbsp of butter or coconut oil
1 tsp. pumpkin pie spice
1/2 tsp. cinnamon
1/4 cup brown sugar
2 tsp. white sugar
dash of salt
 
Remove the seeds from a pumpkin or two, rinse off the pulp and boil in a sauce pan of water for 10 minutes; drain.  Dry off the seeds with a paper towel and place back into sauce pan.  Add the butter or coconut oil, brown sugar and spices.  Cook and stir, coating well for a few minutes.  Spread into a cookie or baking pan.  Roast at 425 for 15 minutes, watch carefully and turn down heat if it starts to burn.  (The burnt ones taste like popcorn :)  Remove from oven and let cool for 3 minutes. 
 
They are VERY HOT, so be careful. 
 
Do not let them completely cool or you will not be able to remove them from the pan after hardening.  Sprinkle them with salt and white sugar.  Remove them onto a glass plate or tray and enjoy! 
We break them apart like peanut brittle.

Pumpkin Pie from a pumpkin (dairy free, too :)

 
Homemade pumpkin pie from a pumpkin (not a can) is something everyone should try making at least once. It isn't nearly as difficult as one would think. I even had success with it as a dairy free recipe.

Here is my very simple and extremely tasty recipe:
 
Ingredients
2 pie crusts
1 pie pumpkin (the small ones not the carving kind)
3 eggs
3/4 cup sugar
1 cup milk (almond, cow, or evaporated all work great)
1/4 tsp. pumpkin pie spice
1/2 tsp. vanilla
whipped cream: optional, and highly recommended
 
Slice the pumpkin, scoop out pulp and seeds.  Then roast in a pan of water in the oven at 350 for 35 minutes, or steam slices in a steamer until soft. 
Set aside to cool. 
 
Prepare pie crusts.  Peal off the skin of pumpkin and place in food processor or blender.  Add eggs, milk and spices and puree.  Pour into pie crusts and bake at 450 for 15 minutes, then turn down the oven to 350 and bake another 30-35 minutes until the center is done.  Remove from oven and serve with whipped cream.
 
There is something very wonderful about eating a pumpkin pie from a pumpkin!  Yes, it adds a step, but you will feel like you accomplished something special and can justify a second piece! 
 
You also will have pumpkin seeds you can roast....that recipe is next!

Thursday, October 18, 2012

Homemade Honey Lemon and Orange Cough Syrup

A few summers ago I was on vacation with the family. The morning after a miserable night in the hotel with coughing kids, I was up and into an Urgent Care. The doctor on call asked me if I had heard of the benefits of natural honey for coughs? I hadn't but LOVE the natural approach to just about everything so was of course all ears! He gave me a packet of studies to read up on about the overwhelming evidences for natural honey being more effective than every single over the counter AND prescription cough medicine. I went to the nearest Farmer's Market and bought some honey. We were able to sleep that night and I have used honey for coughs ever since. This year I decided to up the attack on coughing and am trying an all natural cough syrup with raw honey as it's base. It takes about 10 minutes, quicker than I can get in and out of Walgreens, and makes 1.5 pints of syrup. The total cost here is about $9. Here is my recipe and how to do it.
 
Ingredients:
1 pt. of raw honey
1 orange
1 lemon
1/2 cup water
 
 
Slice the orange and lemon.  Boil in water for 5 minutes to soften the skin and release the pulp.  I mashed mine slightly with a plastic spoon.
 
 
Let the lemon and oranges sit in the water to cool slightly, about 5 minutes, then strain.
 
Pour liquid into clean and sterilized jars.
(My ratio is about 1/3 liquid to 2/3 honey, or 30% to 70%.  Most recipes recommend not exceeding 50% water to 50% honey)
 
 Mix well and store covered in the fridge for as long as you would normally keep honey around.  (For me it is 3-6 months, perfect for cold season)

For Adults use, 1Tbs; children 50 pounds and over, 1 tsp; and children under 50 pounds, ½ tsp. May be taken four times a day or as needed. 

You can also drink it in a cup of herbal tea as a nice way to soothe your throat and quiet your cough.

*This is recipe and blog is not intended to replace medical advice.  Always talk to your doctor and discuss medical treatment, including home remedies, before use.

Some noteworthy notes:

* *DO NOT use honey for children under two years of age - there is a microorganism in honey, which is otherwise harmless for children age two and older, that can sometimes make infants ill because of their young digestive system. Alternatives include brown rice syrup, barley, and organic fruit syrups; as substitutions in the recipes use the same amount as honey.

* DO USE all natural raw honey if at all possible.  It takes a little effort to find a good source, but is well worth your time.  Natural raw honey is full of wonderful antibacterial properties and has been used for thousands of years for it's health benefits.  Recent studies have shown the unusual antibacterial activity of honey, leading to a greater understanding of the ability of honey to kill pathogenic bacteria through several different mechanisms. In studies, honey was effective against many different drug resistant bacteria.

**DO NOT boil, microwave, or overheat your honey as it kills the good stuff in it and changes it's properties. (Think about it like you would the good bacterias in yogurt ;)

*DO Learn more about honey as a medicine.  There are many many resources out there and reliable studies to read on the use of natural honey.  Take the time to educate yourself so that you can make wise health choices for your family.

Learn more:

http://www.mayoclinic.com/health/honey/AN01799

http://www.washingtonpost.com/national/health-science/honey-eases-childrens-coughs-study-shows/2012/08/27/2ed5b478-6a22-11e1-acc6-32fefc7ccd67_story.html

http://www.cbsnews.com/video/watch/?id=7419158n

http://www.foxnews.com/health/2012/08/06/honey-may-ease-nighttime-coughing-in-kids/

Thursday, September 27, 2012

How to get your kids to eat Squash ;)

Well, this week I have been particularly frustrated with my brood of kiddos.  Even the babies who are normally excellent eaters have become picky.  I made Butternut Squash Soup and they turned their noses up at it.  I made tuna noodle casserole (a BIG request 2 weeks ago), but no takers.  Chili, no thanks.  I even made an old standby, Italian Sausage casserole, but apparently bought the wrong kind of noodle!!!  I pulled my now famous pumpkin pie french toast and they were still crying for cereal........UGGGG! 

What is with these kids, don't they know money doesn't grow on trees, there are starving kids in.....you get the point.  So, I decided to NOT go to the store until the end of the week.  I had my hubby stop last night for milk and eggs, but that was it!  He even offered to order me some sushi, but I declined the treat and told him that probably wouldn't be fair to the kids!  So, guess what?  They are all eating what IS in the fridge!  They ask occasionally for a granola bar, I keep reminding them that I will go to the store on Friday.  They will live and this week there will be less to throw out to make way for our next batch of groceries.


Look at that all gone!!!  And they were crying for more  :)
 
Butternut Squash Soup
1 large butternut squash, sliced and steamed
2 cups chicken broth
1 can pumpkin
1can carrots
1 onion diced small and sauted in olive oil
cinnamon, nutmeg, ginger to taste
 
I cook the squash in the vegetable steamer (or cooked face down in a pan of water in the oven). 
Saute the onion in oil and add the scooped out squash.  Pour in the broth.  Drain carrots and add them to the pot as well (you can use fresh carrots, I just happened to have some canned to use up).  Let it cool and run through the food processor.  If it is too thick you can add some milk, water, almond milk OR more broth to taste.  Put back into soup pot and stir in the can of pumpkin and spices to taste  (cinnamon, ginger and nutmeg).  Serve warm, stores in fridge for 1 week.

Monday, September 17, 2012

Garden Fresh Stuffed Peppers

 
We had a bumper crop of green, yellow and purple peppers this year.  I usually make my stuffed pepper stuffing and eat it like a casserole just like my mama taught me, but this year with so many peppers I decided to actually stuff them!  Here is what I did:

I started 2 cups of rice in my steamer while I browned the ground beef in a pot (about 2 lbs of beef).  Then I chopped up 2 onions, 2 tomatoes, and the tops to my peppers and added them to the beef.  When the rice was cooked I added it to the beef mixture with 2 Tbsp. of Worcestershire sauce and 1/4tsp. of chili powder.  I stuffed the peppers, placed them in a pan, covered them with foil and baked for 30 minutes at 350 degrees. I pulled them out of the oven we sprinkled them with shredded cheese (leaving it off for those who can't have dairy).    I have leftover rice mixture and that is great on it's own.  You can cover them in pasta sauce while they bake, but I left it off so they wouldn't get mushy.  They were WONDERFUL!!!  Enjoy!


Friday, August 31, 2012

Shampoo Bars....what????

I know it sounds crazy, but Shampoo bars are really just a blast from the past.  Here is a brief summary on the history of shampoo: 


Shampoo is a hair care product used for the removal of oil, dirt,  skin particles, environmental pollutants that gradually build up in hair. The goal is to remove the unwanted build-up without stripping out so much sebum (natural oils) as to make hair unmanageable.

The word shampoo dates to 1762 in the Eastern part of the world where shampooing was more of a massage of oils into the hair.  It's popularity grew and in the 1860s, the meaning of the word shifted to the applying of soap to the hair.  Before shampoo, regular bar soap was used in the hair.  They were very similar products; both containing the same naturally derived surfactants, (i.e. detergent).  

Modern shampoo as it is known today, was first introduced in the 1930s with Drene, the first shampoo with synthetic surfactants.  (from Wikepedia.com)

Drene Shampoo Advertisement, 1949.

Today there are many chemicals (including liquid plastics, yes, plastic) that are thought to be carcinogens and can actually cause hair loss. Check out your brand on the cosmetic database and see the saftey rating at : http://www.ewg.org/skindeep/

I have been trying to find good homemade alternatives to commercial chemical filled shampoo for years. I finally found a recipe for shampoo bars that had all natural and healthy ingredients. I gave it a try and have used it for over a month (and I have VERY long hair)..... and I LOVE the shampoo bar!  It is the cleanest, actually squeaks, my hair has ever been. 

Here is the recipe I tried (I used Almond Milk in mine):


Luxurious Shampoo Bar Soap Recipe
-9 ounces coconut oil
-9 ounces olive oil
-5 ounces Castor oil
-3 ounces jojoba oil
-2 ounces Shea butter
-2 ounces cocoa butter
-1 ounce beeswax
*Please note, all amounts are per weight. You will need to use a kitchen scale for these measurements.

-4 ounces water
-6 ounces coconut milk*
-4 ounces lye
*You could use only water, an herbal infusion, or any other type of milk.

Optional Essential Oils
-Rosemary and peppermint for dark hair
-Lavender and lemon for blond hair
-Lime and coconut for all types

*Use approximately 0.5-1 ounce of essential oils for this recipe. They are a fun, but not necessary.
 
Directions:
1. Place the water and coconut milk into a large glass measuring cup.
2. Measure out the lye by weight into a 1 cup measuring glass.
3. Carefully add the lye into the liquid and stir to combine. (Adding the liquid to the lye could cause and eruption.) Be careful, the liquid is caustic and not to be touched in anyway. The outside of the bowl will be extremely hot as well. Note: Take the necessary lye precautions with this step. 4. Allow the lye mixture to stay under a vent and cool down while you prepare the oils.
5. Measure all oils, by using a kitchen scale, and pour into a pot.
6. Warm oils and beeswax on low heat until all are melted.
7. Pour melted oils into a crock pot. Be sure the crock pot is on the lowest setting. Note: Do not allow the oils to get to hot.
8.
Add the lye/liquid mixture to the oils in the crock pot and stir.
Note: Any equipment the lye touches needs to be neutralized in a mixture of vinegar, soap, and water. Vinegar will neutralize the lye.
9.
After a brief stir, grab your stick blender and get to work! Blend the oils, lye, and liquid in the crock pot for at least 3-5 minutes. We are working toward ”
trace.”
10. Blend until the mixture becomes a thick, pudding like consistency.
11. Once the mixture is pudding-like, cover the crock pot and “cook” the soap for approximately 1 hour.
12. By the end, the mixture should have folded in on itself and it should be completely transparent. Turn off the crock pot.
13. Now it’s time to prepare the molds. I just use a standard glass loaf pan greased with coconut oil and it’s always worked perfectly.
14. Now is the time to add the essential oils (if using).
15. Spoon soap mixture into molds.
16. Allow soap to cool and harden for 24 hours.
17. Remove from mold on to cutting board and cut into 1 inch thick bars.
18. Place bars on a tray with good airflow so that they can harden further. But go ahead and use your first bar!!!
http://frugallysustainable.com/2011/12/shampoo-bar-soap-recipe/

Be sure to wear the recommended protective clothing, like an apron, goggles and gloves when working with lye.  It is very dangerous.  I was very intimidated, but it wasn't bad when done properly.  I watched the series on Soap Queen TV on Youtube while I was waiting for my supplies to arrive in the mail.  I highly recommend it.  http://www.youtube.com/watch?v=yR6ttCSrLJI

I ordered my ingredients from Brambleberry.com

You can try this yourself, or you can just email me and buy a bar from me.  They are $3 for one or two for $5.  A bar will last you 1-2 months depending on how often you wash your hair.

I am considering making a few more batches soon for Operation Christmas Child boxes, how cool will that be! 

Let me know what you think and have fun creating more naturally homemade!

Chocolate Coconut Bars -Gluten and Dairy Free

Super easy, super good, can't wait for them to be gone so I can try it again!!!

Next time I am going to spread the chocolate icing in the bottom of the pan, or just mix it in the food processor!  Ohhhhhh and pineapple, gonna try pineapple in the next batch too!
Let me know how yours turn out :)

Chocolate Coconut Bars
2 cups shredded coconut
3 Tbsp. coconut oil
1/4 cup maple syrup
2 Tbsp. chocolate icing or chips

Place the syrup, coconut and oil into a food processor and blend for 2 minutes.  Press into a small (I used a 4 x 6 casserole dish).  Warm up the icing (I use store bought/dairy free chocolate icing, but I think chips would be awesome mixed in) and drizzle over the top.  Refrigerate for 1 hour and then cut into small squares.  That's it!

Wednesday, August 1, 2012

saving some plastic and $: baby pool fix

 Every year I seem to buy a plastic baby pool at the end of the season for about $5.  This one I bought last August.  We used it for a month or so on the deck, put it in the basement as a toy box and then brought it back out as soon as it got warm enough to take a bath outside.  It was starting to get holes in it from where we push the side down to let the water out, (now you know you've done it too :) and so the repairing challenge has begun.  I tried several different tapes and they all failed.  At this point I usually give up and toss it to the curb on trash day, but decided this year to try something new......BATHTUB CAULK!!!  It worked like a charm!  I am so happy to save some trash in a landfill and ultimately money in my pocket, even if it is only $5.  It is something I can feel good about and as you can tell from the picture, so do my babies.

Wednesday, July 4, 2012

Granny's Apple Cole Slaw

This is my version of Wolfgang Puck's Apple Cole Slaw.  It took me about 15 minutes to put together, needs about an hour in the fridge before serving, and if you 'like' cole slaw you will LOVE it!!! 

INGREDIENTS:

1 cup mayo
1/4 cup apple cider vinegar
1 Tbsp sugar or 2 Tbsp. honey
1/4 tsp. poppy seeds
dash of pepper, paprika, and salt
1 Tbsp. brown or yellow mustard
(Mix these together and put into the fridge while you cut your apples)

2-3 Granny Smith apples sliced and cut into matchsticks
1 bag of cole slaw mix
1/4 cup raisins
1 cup sweet corn
 (mix these in and put into the fridge for about an hour before serving)

Stir in nuts of your choice before serving.  I used honey roasted and sliced almonds!  Have a very Happy Fourth of July, everyone :)

Monday, July 2, 2012

easy Banana Ice Cream - dairy and gluten free

"Why yes, you CAN have an ice cream cone for lunch!"   Have you ever been able to say that to your kids?????  I can and you can too!  Just follow these simple steps and you will all be screaming for ice cream!  I promise the only ingredients in this were bananas and real vanilla extract.  You can add ingredients to your taste or diet, but this one was excellent plain!


STEP 1: Break up and freeze bananas


STEP 2:  Blend in blender with 1 tsp. vanilla a few pieces at a time.


STEP 3: Put in storage container and back into the freezer for scoopable ice cream!

Optional Add-Ins:  Peanut butter, chocoalte chips, strawberries, cherries, marshmallows, nuts, Reeses Peanut Butter cups (yes, please), Hershey's syrup (in the above picture), M & M's, caramel sauce, crushed graham crackers, vanilla wafers, or oreos, oh my!

Thursday, June 28, 2012

Outdoor Chair Cushions- RE DO in 1 hour!

Our patio furniture has lasted us about 9 years so far and still looks great....except for the chair cushions of course.  I usually buy them on sale at the end of the season every other year, but this year we can't wait.  They looked that bad!  This time I wanted to save the landfill from my ripped cushions and try to recover them.  I LOVE THEM!!!  Here is what I did:

BEFORE

I bought 8 yds. of Outdoor Fabric from the clearance section at Hancock Fabrics.  (it was 56" wide)
It was $6 yd. and I had a 10% off coupon making my purchase around $44.00


My cushions were standard sized at 42" x 22"

I cut the fabric at 47" leaving me a rectangle 56" x 47".  (You may need to trim off the sides or take it in depending on your cushion size.)  Next, I folded it over and sewed the top and side seams, right sides together with my surger, but you could use a conventional machine.  Basically this left me with an inside out pillowcase.  Flip it right side out and put in the cushion. 
Then, I used my surger and closed off the bottom of the cushion.  If you have a regular sewing machine you may want to slip stitch it closed.  That is it! 

AFTER


You could sew it more fitted if you want or add the seperation lines in the middle of the top cushion, but I was pleased with them and was happy to be done in just a few minutes per pillow. I made 6 in less than 1 hour!

The babies were happy too!!!

Saturday, June 16, 2012

Italian Sausage Casserole - freezer meal

Here is a super simple recipe for Italian Sausage Casserole.  I doubled it (so half it if you want just one). It is perfect to have one tonight and throw the other into the freezer for later.  Ciao!


ITALIAN SAUSAGE CASSEROLE
2 Pks. Italian Sausage
1 onion
1 Tbsp. minced garlic
2 zucchini
2 boxes Penne or Bowtie pasta
2 jars spaghetti sauce
1 cup. mozzarella cheese


Saute the sausage (I split the sausages and squeeze them out of the casing).  Add the diced onion, zucchini and garlic, cook for 5 minutes.  Boil noodles and drain.  In a large mixing bowl or pot mix all the ingredients together.  Spoon half into a casserole dish and top with cheese.  Bake at 350 for 25 minutes. 

Put the remaining into freezer safe bags and store in the freezer until next time.  Thaw and bake the same way. 

Serve with salad and garlic bread or if you want to try focaccia bread try this recipe:http://naturallyhomemade.blogspot.com/2012/04/homemade-focaccia-bread.html


Friday, June 8, 2012

mini chocolate croissants: freezer recipe

I have been enjoying the benefits of preparing great food in advance and storing it in the freezer.  It is called 'freezer cooking' and has been saving me valuable time and money, as well as being able to pull amazing things out and in a flash wowing my guests.  Recently, I tried a chocolate croissant recipe that was well worth the effort.  My kids called them an awesome dessert, but I just had to have a few with my morning coffee, making them breakfast!  This recipe makes 64 mini rolls, but only about 50 made it to the freezer.  This is one of those recipes that I don't mind the kids polishing off quickly so I can try it again ;)


Mini Chocolate Croissants
2 TBSP. Yeast
1.5 cups milk
3/4 cup butter
1 tsp. salt
3/4 cup sugar
3 eggs
7 cups flour
1/2 bag chocolate chips

Melt the butter in the milk in a saucepan.  When it is warm, not hot, pour it into the yeast and sugar.  Let set for 5 minutes.  Add eggs, mixing well.  Add salt and then the flour 2 cups at a time until well blended. (I use a Kitchen Aide mixer)   Divide the dough into 4 equal pieces.
Roll out one portion of the dough into a circle about 12" in diameter.

Here is where little hands can help (but be sure you have extra chips or you will run short).  Cut the circle of dough into  16 pieces like a pizza.  Add chocolate chips to each triangle and roll them up from the outside in, placing each crescent roll on a greased cookie sheet.  (Because these are mini sized I used 3 cookie sheets total.)

Set the cookie sheets in a warm place and let rise 2-5 hours or until doubled in size.  Bake at 350 degrees for 12 minutes or until golden brown.  Place on a cooling rack to cool and then sprinkle with powdered sugar.  After flash freezing them, I do it on the cooling rack, then put into a gallon sized plastic bag for storage in the freezer.  Take out of the freezer and let them defrost for 15 minutes before serving, or if you want you can heat them up for a few seconds in the microwave and serve warm.  I grabbed 3 on the way out the door this morning and ate them in the car with my latte...HEAVEN!!!!!

Thursday, May 31, 2012

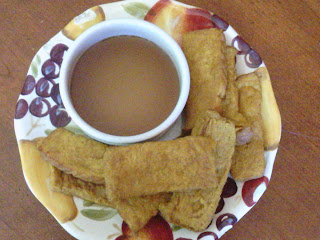
Banana Bread French Toast Sticks - freezer meals

Ever heard the saying, "Necessity is the Mother of invention?"  Well for me, Necessity is the Mother of new recipe!"  I was making our new standard Pumpkin Pie French toast sticks for the freezer last week and I made a planning error:  DO NOT MAKE THEM WITH THE KIDS AROUND!!! Take it from me!  I could hardly keep ahead of them as I pulled them off the griddle.  I finally sent them all away and started on a second batch, but was out of pumpkin puree.  I improvised and think these are just as great, if not better, than the original recipe.  Here it is:


BANANA BREAD FRENCH TOAST STICKS
Ingredients:
2 bananas
1 can of carrots
12 eggs
1/2 cup milk of your choice
1/4 cup brown sugar
1/2 tsp. each of cinnamon, nutmeg, and vanilla
2 loaves of bread
powdered sugar (optional)

Mix in a blender the can of carrots (drained), milk, banana and 6 eggs.  Pour into a large bowl.  Blend up the rest of ingredients and add to the first mix.  (The reason I do it separately is because my blender wouldn't hold all of the batter so I divide it into two batches.)

Dip individual slices of bread into the batter and cook them on a griddle or frying pan, turning once for each side. 

***In  my previous post on Pumpkin Pie french toast sticks I was baking them in the oven.  I have found that if just do them normally in slices on a griddle it is faster and easier to clean up saving you more time and effort.  I can fit 6 slices on the griddle and take them off laying them directly to a cutting board where I cut them into sticks with a pizza cutter. 

Place the strips onto a baking rack to cool and sprinkle with powdered sugar.  (This is usually when they start disappearing one by one as the kids 'help' sprinkle powdered sugar on them). 

When my baking rack is full I place it in the freezer to flash freeze them (about 30 minutes).  Then you can store them in gallon freezer bags without them sticking together. 

Take out your desired amount of French Toast sticks and warm in the microwave, toaster or oven.

Friday, May 25, 2012

'Almost' Perfect Chocolate Waffles

We were driving home from a long day at the zoo and my mind started frantically trying to remember all the items in my freezer and pantry as we sat in Memorial Day weekend traffic.  I knew the frozen fruit smoothies and egg burritos we took to the park for lunch would soon wear off and I would have 7 hungry kidlets, probably just about the time we would pull into the driveway.   I was right.  I remembered my ace in my back pocket.......waffle mix.  The kids were starving and the only way I convinced them to put down the box of cereal and wait for me to make waffles was to add cocoa and promise whipped cream and chocolate syrup!  They were a fabulous and spontaneous creation, but were missing one ingredient...bananas on top would have made this recipe perfect!  Oh well, I guess I will just have to make them again!


Chocolate Waffles

4 cups baking mix
1/2 cup sugar
1/3 cup cocoa powder
2-3 cups water
1 cup of milk (your choice, I used Almond)
3 eggs
1tsp. vanilla
1 Tbsp. Vegetable Oil

Optional toppings: strawberries, chocolate syrup, bananas, nuts, choc chips, whipped cream, caramel, cherries, m & m's, peanut butter.....the list goes on and on!

Mix all of the ingredients in a large bowl, add liquid until batter is the right consistency. 
Pour into your waffle iron (this one is mine:) http://www.kohls.com/kohlsStore/kitchen/electrics/wafflemakers/PRD~275565/Bella+Rotating+Belgian+Waffle+Maker.jsp)
Cook until done (about 4 minutes) and then top with toppings. ENJOY!

Thursday, May 17, 2012

Tuesday is freezer meals day- French Toast sticks, smoothies, pizza pockets and egg sandwich patties!

Mondays are my 'catch up on the house' days, Tuesdays are my 'catch up on the freezer meals' days.  I have found that if I put some time preparing snacks and meals in advance I save time later.  This week I made 120 French toast sticks, 18 pizza pockets, 10 smoothie packs, 20 breakfast egg patties, and 14 carrot juice ice cube packs for smoothies.  Total in time it took 2 hours and has saved me tons of time later on in the week.  The best part is that the  kids (and my husband and I) have really good choices that take little time from freezer to table.


The Pumpkin Pie french toast sticks were yummy. (I made them while I was making dinner Sunday night.) I took 1 can pumpkin, 1 can of sweet potatoes and mashed them thoroughly. I split the mash into two bowls. The first bowl got my waffle mix added to it and as I made the waffles for dinner I worked on the french toast, too. Add 1 dozen eggs, 1/2 cup milk (I used almond), 1 tsp. vanilla and 1/2 cup brown sugar to the mash. Mix well. Stir in 1/2 tsp. of cinnamon and 1/2 tsp. of nutmeg. Take 1.5 loaves of bread (about 42 pieces) and split the slices into thirds. Take each strip and dip it in the batter then place it on a baking sheet. Bake at 375 for 15 minutes, flip and bake 3 more minutes on the other side. I flash froze the batches in the freezer on a baking rack and then combined them into a gallon size zipper bag. Reheat the sticks in the toaster oven or microwave.

Tuesday I made pizza pockets for the first time, they were fabulous. Here is the link to that recipe:
http://naturallyhomemade.blogspot.com/2012/05/pizza-pockets.html


Then I made smoothie packs from 3 cartons of strawberries, 1 bag frozen blueberries, and 1 bunch bananas.  (I juice 5 lbs. of carrots once a week and freeze them in 1 cup portions.  I also save leftover watermelon juice and freeze it the same way to add in our smoothies instead of ice.)  Here is my favorite Green Monster smoothie recipe: http://naturallyhomemade.blogspot.com/2012/05/green-monster-smoothies.html


Next, I decided to use up the rest of the diced veggies by making breakfast sandwich egg patties.  Just take 10 eggs mix well, add 2 cups of spinach (sauteed with chopped turkey bacon and onions, and cooled) and sprinkle the veggies and bacon into eggs.  Bake in a greased rectangular cake pan at 375 for 20 minutes.  Take out of oven and let cool.  Cut into squares and freeze in plastic bags in the freezer.  To eat, reheat the patty in the microwave and serve on a toasted English muffin with a slice of cheese....delicious!


When I was finished with the 'freezer' cooking the kids came in and showed me the toad they found in the sandbox....they were busy too!

Green Monster Smoothies

Okay, so the other day I was reading a blog and found a smoothie recipe for Green Monster smoothies.  I was VERY sceptical, but decided to give it a try.  The blogger promised me that my kids would suck down the mostly spinach and kale smoothies and beg for more.  I tried it and guess what?  She was right!  My kids literally beg me to make them and even our baby twins cry when the blender goes off and I start pouring cups.  I have to make 2 batches at a time so everyone will get their fair share and will even confess that when the kids were out in the sandbox the other day I snuck a whole one for myself!

So here is our version, I promise it just tastes like a banana smoothie!


Green Monster Smoothie~
4-5 cups fresh spinach
2 cups fresh kale leaves ( I pull them off the stem, the stem can be bitter)
1/2 cup orange juice
1/2 cup carrot juice
1 banana
ice cubes

Puree the greens in the juice.  (We juice a 5lb. bag of carrots once a week and have them frozen into 1 cup portions in the fridge.  You could leave it out, but I add it for an extra vitamin packed kick).  Be sure to blend the heck out of the greens, no one wants chunky spinach in their smoothie. Add banana and ice and mix until smooth.  Pour into glasses and ENJOY!

pizza pockets-freezer meals


These were crazy good!  Even the baby boy crawled up his high chair, grabbed one off a plate and proceeded to eat the entire thing!   Money Saving Mom.com is the page where I found the idea. (http://moneysavingmom.com/2012/05/4-weeks-to-fill-your-freezer-homemade-pizza-pockets-day-8.html) I adapted the filling to my family and what was in my freezer.  We used a turkey polish sausage, cheese, spaghetti sauce and veggies to fill them.  I marked the 'no cheese' pockets with an X for my dairy free girl.
Dough:
2 Tbsp. dry active Yeast
2 cups warm water
2 tsp. sugar
2 tsp. salt
4 Tbsp. Olive oil
5 cups flour

Filling:
1/2 jar of spaghetti sauce
1 turkey polish sausage link cut into slices like pepperoni
diced veggies
shredded cheese

Mix the first 3 ingredients in your kitchen aide or mixer.  Leave to sit and dissolve for 5 minutes.  Slowly add the flour, salt, and lastly oil.  The dough will pull together and be slightly sticky.  (I left mine to rise for an hour while I ran to the store to get shredded cheese ;)  Arrange your filling ingredients on the counter near your floured rolling surface.  Pinch off dough and shape into a ball in your hand, mine were about the size of a clementine orange.  Roll the ball into a flat circle with a rolling pin.


 Add a spoonful of filling/cheese to the center and fold over dough closing up the side and pinching seams.  Place on a baking sheet and bake at 375 for 15-20 minutes.  Let cool and store in a container or bag in freezer.  Reheat in toaster oven or microwave.  Makes 16-18 pizza pockets depending on your size.

Wednesday, May 2, 2012

Doughnuts..."Deceptive Doughnuts"...hmmm!

Deceptive Doughnuts.....look pretty good!


Mix the batter in a plastic bag, perfect job for little helpers.


Snip the corner off the bag and make your circles on a baking sheet.

If you sandwich them together with a little icing they look just like a real doughnut.

Chocolate doughnut sandwiched with peanut butter...mmmmm!


3 batches of deceptive doughnuts are all GONE!!!

     A close friend of mine challenged me to read Deceptively Delicious, by Jessica Seinfeld. It is a cookbook with recipes that hide pureed healthy foods into them, so your picky eaters will not realize they just ate them. I have tried (and tweaked) her doughnut recipe and am happy to share with you what we think so far:

1. Picky eaters that have the ability to read are automatically suspicious at the new 'Deceptive' cookbook.

2. You will be asked the entire time they are baking, "But what is in them???"

3. Picky eaters who are on to you will say they won't try them, but they will, probably when you are not looking.

4.You can use any type of milk, I used dairy free due to a child with allergies.

5. Mix the wet ingredients into your blender and the dry in a large plastic storage bag. Then knead the two together in the closed bag. Snip off the end of the bag and pipe circles of batter onto your baking sheet. The only dish to clean will be the mixer pitcher and you can toss the bag away after the batter is used up.

6. You can call anything a doughnut, therefore making children fight over them, even knowing mom put beets and carrots into them.

7.  If you do not have the purees on hand, canned vegetables work great.

8. I prefer to just tell them what I put in there rather than being deceptive, with all due respect to Mrs. Seinfeld. After all, how else will you be able to say, "Eat your carrots, you do like them remember,they are in our doughnuts!"
So here are the 3 versions I tried, along with the original recipe from Jessica Seinfeld. I will just list the ingredients for all 4 versions and then the directions after. You make them all the same way, anyway.

banana- sweet potato -carrot doughnut
1/2 banana
1 cup pureed swt. potato
1/2 cup pureed carrots
1/2 cup coconut milk
1 egg
1 tsp. vegetable shortening
1 tsp. vanilla
1 cup flour
1 tsp. tsp.baking powder
1/2 tsp. baking soda
1/2 cup brown sugar
cinnamon
powdered sugar

apple- sweet potato -carrot doughnut
1/2 cup pureed swt. potato
1/2 cup pureed carrots
3 Tbsp. Apple Butter (click here for my crock pot recipe)
1/2 cup almond milk
1 egg
1 tsp. vegetable shortening
1 cup flour
1 tsp. tsp.baking powder
1/2 tsp. baking soda
1/2 cup brown sugar
cinnamon
powdered sugar

chocolate doughnut w/ beets and carrots (yes you read that right!)
1/3 cup pureed carrots
1/3 cup pureed beets
1/2 cup almond milk
2 eggs
1 tsp. vegetable shortening
2 cups flour
2 tsp. tsp.baking powder
3/4 cup brown sugar
3 Tbsp. Cocoa powder
powdered sugar
peanut butter (optional)

Jessica Seinfeld's doughnut recipe
1/2 cup pureed swt. potato
1/2 cup pureed pumpkin
1/2 cup milk

1 egg
1 tsp. vegetable shortening

1 cup flour
1 tsp. tsp.baking powder
1/2 tsp. baking soda
1/2 cup brown sugar
cinnamon
powdered sugar


Mix the wet ingredients into the blender.  Place the dry ingredients into a plastic bag.  Add the two together and then snip off the corner.  Draw circles with your batter on your baking sheet.  Bake at a 350 degree oven for 15-17 minutes.  Take out of oven to cool on rack.  Sandwiche donuts together making them more round.  We used icing and peanut butter.  Enjoy experimenting!  Let me know what you come up with!!!