Search This Blog

Showing posts with label healthy. Show all posts

Monday, November 10, 2014

Beef Bone Broth


Want to do something really easy? How about really healthy?  Or just want to drive your dog crazy all day???  Try this recipe for making healthy, easy, yummy, dog driving crazy beef bone broth.  It makes a wonderful base for soups, stews, casseroles and can even be used a cup at a time.  

5-6 lbs of beef soup bones
10 peppercorns
2 chopped carrots
2 chopped celery stalks
1 whole garlic, peeled
2 chopped onions
Water
1 Tbsp sea salt

First, roast the bones at 400 degrees for 1 hour.  Next, add the veggies and continue roasting another hour.  Transfer everything in roaster to a large soup pot.  Use batches of warm water to roaster to deglaze pan and add to soup pot.  You'll be surprised at how much caamelization occurs!  Sprinkle sea salt over top.  Fill your soup pot 3/4 full with water and simmer on stove top for 4 hours.  Turn off heat and let cool.  Strain the liquid from the solids.  (I use the meat chunks in my homemade dog food, but be sure to separate out the garlic and onions.) That's it, you're done!  Super healthy, simple and will keep your dog under your feet all day hoping for a taste, which he got..... :)-


Oh, and I store mine in large mason jars and freezer safe ziplock bags.  Just pull one out and you're ready to make a rich soup in just a few minutes!


He has camped out here all day!

Wednesday, July 2, 2014

Basic Vanilla Microwave Mug Cake

So here is the second post for the basic mug cake recipe.  This one is non-chocolate.  You can change up this recipe into so many different types of cake, it's crazy.   I will give you a few of my favorite add in's at the end.  Enjoy creating your perfect cake!

(Carrot Mug Cake with. Team cheese icing, pictured)

Basic Vanilla mug cake recipe:

1 Tbsp melted coconut oil
1/2 Tbsp sweetener of choice (I use Truvia)
1.5 Tbsp almond or oat flour
1.5 Tbsp of flax meal or coconut flour
1/2 tsp aluminum free baking soda
1 egg
Few drops of vanilla extract
Dash organic cinnamon and sea salt
1-2 tsp water or "milk" of your choice

Mix all ingredients together well in microwave safe mug or small dish.  Microwave on high for 1-1.5 minutes or until center is firm.  Top with your favorite toppings, fruit, yogurt or powdered stevia or enjoy plain!

Add these ingredients to make other versions: 

Cherry vanilla- chopped cherries and almond extract

Pecan coffee cake- chopped pecans, almond extract, 1/2 tsp blackstrap molasses or maple syrup

Orange dreamcicle- orange extract, orange zest (omit cinnamon)

Lemon poppyseed- 1/4 tsp poppy seeds, lemon extract, lemon zest

Carrot Mug Cake-(use oat flour) add coconut, raisins, shredded carrots, and carrot juice for the liquid.

Banana bread in a mug- 1/2 mashed banana, almond or caramel extract, chopped pecans

Strawberry coffee cake- chopped strawberries, walnuts, almond extract, melt 1 tsp butter on top after cooked.

Cherry cheesecake Cake- mix in 1 Tbsp softened cream cheese and 1 Tbsp ricotta cheese into batter and top with
Fresh cherries.

Caramel cake- add caramel extract, 1 tsp butter, 1 tsp blackstrap molasses

Blueberry muffin- blueberries, 1 tsp butter, almond extract 

......the possibilities are truly endless!!!!! 


Chocolate Microwave Mug Cake

As promised, here is the beginning of a mug cake series!  I've been eating these for breakfast for over a year now and am hooked!  It doesn't hurt that they help you lose weight, are gluten, dairy and sugar free and full of great stuff to start your day.  I change up the recipe based on what sounds good to me and what ingredients I have on hand.  I've decided to post the base for a chocolate and then show you what to add to make different flavors for this post.

Basic chocolate mug cake:

1 Tbsp melted coconut oil
1 Tbsp cocoa powder
1 Tbsp almond flour
1 Tbsp flax meal or coconut flour
1/2 tsp aluminum free baking soda
1 egg
1/2 Tbsp sweetener of your choice (I use Truvia)
Few drops of vanilla extract
Dash organic cinnamon and sea salt
1-2 tsp water or "milk" of your choice

Mix well in a microwave safe coffee mug or ramikin dish.  Microwave in high for 1-1.5 minutes until center is firm.  Enjoy plain or with your favorite toppings.

*I top them with powdered stevia, whipped cream, Greek yogurt, fresh fruit or even a Tbsp of cream cheese. I've also made a yogurt and cream cheese icing to store in the fridge for a weeks worth of mug cake breakfasts!  You can't mess this up, just jump in and get creative. 

Here are a few other versions I've made:

Chocolate banana: add 1/2 mashed banana and 1/2 tsp almond extract

Orange chocolate: add orange zest and  a few drops of pure orange extract

Chocolate covered strawberry: add almond extract and chopped strawberries

Caramel chocolate: add caramel extract and melt a tsp butter on top after cooked

Cherry chocolate: almond extract and chopped cherries

I think you get the picture!  Now go have fun and create :)


Family Sized "Mug" Cake

I'm slightly obsessed with microwaved mug cakes.  It brings out the Easy Bake Oven little girl in me.  It's also an excuse to have cake for breakfast!  Who doesn't love that?  And if you need another reason, which I don't, it's healthy too!!!!  Kind of like no guilt happiness in 1.5 minutes.  Well, with seven kids you can imagine one mug cake isn't going to cut it.  I've lined up our mugs and created a mini cake factory, but found that most mornings I prefer to just quadruple the recipe and make it once.  

Here is today's yummy version:


In a large glass deep dish pie plate mix

3 Tbsp melted coconut oil
2 mashed bananas
4 eggs
3 Tbsp almond flour
3 Tbsp flax meal
1/4 cup Truvia (or sweetener of your choice)
1 Tbsp aluminum free baking powder
1/2 tsp cinnamon
Dash salt & vanilla extract

Mix well, sprinkle in blueberries and 1/2 cup chopped strawberries.  Microwave on high for 11-13 minutes, until the center is firm.  I served it sprinkled with powdered stevia and chopped pecans.


I just realized that I've been eating mug cakes and become quite a pro at them I might add, for over a year now.  I can't believe I haven't blogged them!  So get ready for a bunch of recipes to come.......


Saturday, June 7, 2014

Gluten Free -Sugar Free AND Yummy Pancakes

It's been a while since I posted, but that doesn't mean I have been doing things naturally or homemade.  It has been between 1-2 yrs since I started eating low carb and no sugar.  I feel so much better and now when I have, oh maybe a donut or something like that, I feel nauseous within minutes.  I've lost 25 lbs and most importantly, kept it off.  I haven't shared what I've been eating regularly, so I'm going to try to post my favorites in hopes that you can see it is possible.  I've read many books on the subject and have called my diet "The God Diet". Eat foods the way God created them, minimally processed and as whole as possible.  I buy almost exclusively organic and have learned how to feed my family on a budget and remove the dreaded cereal addiction from my pantry.  We are not perfect, we cheat, we eat out, we are REAL :)

Here is my family's favorite breakfast, which I make in 5 minutes and bake for 20. (If you want to flip pancakes for 2 hours you may cook them in a griddle). It will last us 3-4 mornings and the kids beg me for it.  Enjoy, and feel free to downsize the recipe (or increase :) to fit your needs.  This recipe makes about 62 small pancakes.

Gluten free -Sugar free Pancakes

4 cups rolled oats 
1 Tbsp baking powder
1/2 tsp sea salt
2 Tbsp Stevia/Truvia or sweetener of your choice
1/2 tsp cinnamon

•pulverize it together in blender

•add 1 tsp vanilla, large container of egg whites, large container cottage cheese, 1 Tbsp coconut oil, blend well. 


•here's where you choose, oven baked or pan fried.  If you're using the stove top, make like normal pancakes.  If your baking in the oven, preheat it to 350 degrees and bake for 15 minutes per pan or until done in the middle.  This batch makes 3 pans 1/3 full.  I've found it is the perfect thickness. ( Any fuller and the pancakes are doughey in the middle.) be sure to spay your pans with nonstick spray, I use coconut.


•remove from oven and let cool.  Cut into bars.  


•serve with fruit, whipped cream, maple syrup, etc.

Store leftovers in plastic zipper bag in fridge for the next breakfast.  Hide from the kids or you'll be making them again tomorrow 😍


Here is a pan fried batch:

Sunday, March 9, 2014

Hidden zucchini, lasagna ;)

My kids hate zucchini, so they say.  I made a regular lasagna last night for the kids and a veggie-noodless one for me and they just raved about how great their's was.  What no one (except you) knows is that I peeled and shredded 2 whole zucchinis and mixed it into their ricotta cheese layer.  I've tried that in the past and they complained instantly that there was some weird green things in their lasagna.  But not this time!  This time they went back for seconds and my oldest son, also the pickiest, had thirds.  So, don't give up mamas.  You know you can outsmart them and get some veggies in even the pickiest eaters, just don't give up!

This is the peeled and shredded zucchini.  When I mixed it with the ricotta cheese, eggs and spices it looked just like shredded mozzarella :)-

Monday, October 28, 2013

All Natural Applesauce


We were at Royal Oaks Apple Orchard recently and bought a bushel of windfall apples.  Today, I finally had a morning to turn them into applesauce.  The kids quickly took the slicing and dicing over and I did the dishes.  I forgot how easy....and delicious this is!


We sliced 30-35 apples with an apple slicer, we also left the skins on.  Then, we chopped them into chunks with a chopper.


Add them to a large pot with 2-3 cups of water, 1/4 cup apple cider vinegar and 1/2 cup brown sugar.  


Cook on med-low heat until tender.  Add 2-3 Tbsp. of cinnamon.  Put in small batches through a food processor.  Pour into your sterilized jars and top with lids.


Our first jar didn't make it to the pantry, but was eaten by some sneaky monkeys ;)


I add 2 cups of blueberries to the last bit for blueberry-applesauce.  It was so good :)


This batch made 11 pints of homemade applesauce.  

Wednesday, October 9, 2013

Sausage Stuffed Acorn Squash


I just received the new 21 Day Sugar Detox book in the mail.  It is going to be released to the public in a couple of weeks, but I was asked to preview it, test the recipes and blog about it to my hearts content.  I will tell you that it looks amazing and after just one afternoon speed reading and flipping through the new meal ideas I was totally inspired.  I think this book is going to be a big hit.  I have made my grocery list for tomorrow, but in the meantime I came up with this idea for dinner.  It was super easy and yummy!

 Ingredients:

2 Acorn squash or one medium Spaghetti squash 
1 lb. Italian sausage
5 garlic cloves, chopped
2 green apples, chopped
Shredded cheese to top with

Sauté the sausage, turn off the heat and drain most of the fat. (*At this point I split the meat in half to make a breakfast omelette, too).  Add the apples and garlic to the pan with half of the sausage.  Cook for 2-3 minutes on low.  Remove from heat and store in fridge until dinner or you are ready to eat.


Slice Acorn squash in half.  If you have trouble cutting it, try microwaving it for a couple of minutes first. ( Be careful it gets really hot. )  Cook the squash face down until skin is tender.  I use a vegetable steamer, but you can also cook it face down in a pan of water in the oven.  Remove squash and scoop out the seeds, discard.  Fill with sausage mixture, top with cheese and brown in the oven at 400 degrees, takes about 10-12 minutes.  Serve immediately and enjoy.  The flavors together were amazing!


*now for the bonus breakfast omelette 

Remember when I took half the cooked sausage out and set it aside.  Put it back in your now empty skillet.  Crack and beat 6 eggs, slice your favorite veggies and cook it all together on low heat until done.  There you go 2 healthy meals in the same prep time as 1.


Tuesday, May 14, 2013

Paleo Italian 3 Squash Casserole


I have been filling my freezer with as many healthy and quick meals as I can.  The other night I was tempted to eat the kids spaghetti noodles, but was able to resist by pulling out a two serving bag of chicken chili instead!  Worked like a charm.  This morning I got up and started making the kids breakfast.  I decided if I was going to be stuck at the stove cooking anyway, I should whip out a freezer meal too.  I love multitasking.  The result of my 'impromptu' recipe was wonderful.  I put 2 small casseroles In the fridge and ate a plate of the leftovers for breakfast too!

Here's what I did:

Brown 1/2 lb. Italian sausage
Chop one onion, small eggplant, yellow squash, zucchini and slice 1/2 cup cabbage.  Add to skillet and sauté.  Add 2-3 cups spaghetti sauce (I use marinara, because it is all I can find without added sugar and I love the taste).  Add 1-2 cups of water and cover.  Simmer for 20 minutes.  

Prepare your pans for the freezer.  I use 2 bread loaf pans.  They are perfect for two one serving meals.  Take aluminum foil and line the pans, with extra foil peaking out to cover the top when you close it.  Cross-cross the foil.  

Spoon the casserole mixture into the pans.  Let cool.  


Top with mozzarella cheese.  Cover with foil tabs and freeze in your freezer.  


After they are frozen, remove from freezer, and loaf pans.  Slip each foil packet casserole into a freezer storage bag and be sure to label it so you won't be playing a mystery meal game a few weeks from now!  Put back into the freezer.


When you are ready to eat it, remove from freezer, pop back into the loaf pan you made your mold from, and bake at 375 until bubbly.  Cook times will vary depending on much you fill your pan and if you cook from frozen or thawed.  Enjoy, you are planning ahead for your success!


Saturday, May 11, 2013

Paleo Eggplant Pizza

One of ideas food gurus suggest to instill healthy eating habits in your kids is to let them pick our a few 'exotic' new foods to try each week while you're at the store.  Today's trip to Woodman's resulted in imitation cherry chocolate chips from my teenager and eggplant and Chinese cabbage from my 5 yr old.  I did a quick search on recipes for the eggplant and decided on mini eggplant pizzas. the 5 year old  helped me slice them, bake them, top them and then she tried it!   

Bottom line?  She was interested, involved and adventurous???? And I have an entire plate of eggplant Parmesan pizzas to eat tonight, but it's progress right????  Look at the Mother's Day Card in her hand.  It says in her handwriting, "thank you mommy for taking good care of me!"  I'll keep trying. ;)

Here's what we did:

Slice eggplant into 1/4 inch slices.  Lightly coat with olive oil.  Bake at 350 for 5 minutes.  Remove from oven, top each slice with sauce (I used marinara) and mozzarella.  Sprinkle on Parmesan cheese and bake or broil until cheese is toasted and bubbly.  Serve warm.


Thursday, March 28, 2013

Chocolate banana frozen yogurt pops

This morning we woke up to no milk, cereal or bananas, so the kids get Popsicles for breakfast. There is a lot of mmmmmms and lip smacking going on right now, I think I can safely say they are pretty happy about that!


2 bananas
1/2 cup plain yogurt (mine is homemade ;)
1/4 cup heavy cream
1 Tbsp cocoa powder

Mix in a blender and pour into Popsicle molds. Freeze and enjoy!


Sunday, March 24, 2013

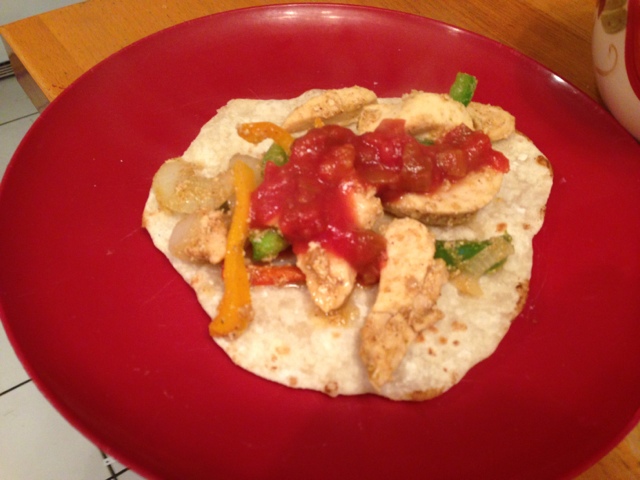
Chicken fajitas with homemade tortillas

Well this recipe is not exactly on the gluten free diet unless you use alternative flour or skip the tortillas altogether, but I made them for the kids who all agreed they were the best tortillas they ever tasted. My 7 year old son even have me a huge hug after dinner and said, "Thank you mommy for learning how to cook so much stuff, you're a real chef now!" Awe, that made it all worth the effort. I always tell the girls when their daddy raises the bar for their future husband, and tonight I think I just raised the bar for the boys' potential wife :)

Ingredients:

Tortilla dough- 2 cups flour, 3/4 cup water, 1/2 tsp salt and 3 Tbsp olive oil.

4-5 chicken breasts
1 green pepper
1 Red pepper
1 orange pepper
1 onion

Taco seasoning:
1/4 tsp each of garlic salt, garlic powder, onion powder, paprika, chili powder, and cumin.
1/4 cup water

Make tortilla dough. Dump out onto a floured surface. Knead the dough a few times. Divide the dough into 8 equal pieces. Let sit for 10 minutes.

Slice the chicken into strips and sauté it in olive oil while the dough is resting. Add taco seasonings and water, cover and simmer for 20 minutes.

While the chicken is cooking roll out the tortillas as thin as possible and fry in oil one at a time. Flip them like a pancake to cook each side.

Add vegetables to chicken and cook for 5 minutes or until they are the fineness you like. Serve with salsa, avocado, cheese and sour cream.

I dumped mine into a Romain lettuce leaf, but admit I tasted a small piece of a tortilla....it was good!!!

(You may notice in the picture that I doubled the tortilla dough recipe. I made the second set fried in butter and sprinkled with cinnamon and sugar for dessert. I'll post that recipe next :)


Wednesday, March 20, 2013

Toddler snacks: Peanut Butter Rice Crispies

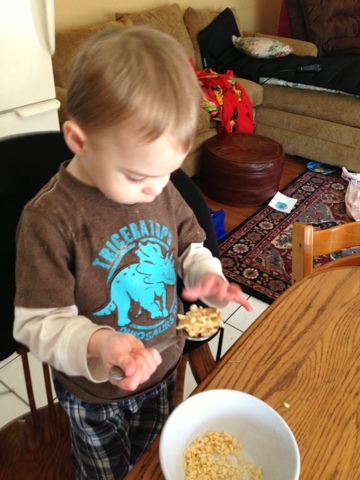
I'm always looking for simple and healthy ways to get the kids to eat better. We have 2 year old twins that are in the 'I can do it myself' phase. Cereal is so messy, so far I've come up with 2 fun ways to eat it that get more in their mouth and less on the floor.

I take a small spoonful of natural peanut butter or 1/4 of a banana and give them a few spoonfuls of Rice Crispies at a time and let them dip into the cereal bowl. The cereal sticks to the spoon of peanut butter or banana and they love getting to do it their self! What ideas have you found that work with independent eaters?